Skip to examples

Free examples · No account needed

WA ASET practice questions with answers

Explore three questions each for Reading, Quantitative and Abstract Reasoning, plus a Writing picture prompt. Try a question, then open its explanation to see how to work through it. You can start with any area.

These are Selective Path examples, not official sample questions or a full test. They are separate from our practice papers and mock exams. They do not predict an ASET score or admission.

Choose an answer if you like, or go straight to the explanation. This page does not mark or save your answers.

Three practice questions

Back to sections ↑

Reading comprehension

Use two short passages to practise drawing an inference, understanding a word in context and recognising an author’s purpose.

Read this passage for questions 1 and 2.

The thank-you page

On the afternoon before the community cookbook went to print, Nell laid its pages across the kitchen table. She had spent three evenings fitting the names onto the thank-you page, and the columns finally lined up. Recipe writers first, then photographers, then the people who had typed everything. At the bottom she had added a drawing of a mixing bowl. There was scarcely a finger’s width of paper left unused.

Mr Ellis came through carrying a box of baking tins, each washed and wrapped in a tea towel. “Ready to go back,” he said. During the cooking sessions Nell had simply found the right tins waiting on the bench. Now he explained that he had borrowed them from six neighbours. He opened a notebook to check their addresses. Between the pages were recipe cards he had collected from people who could not email them.

Nell looked again at her page. “We thanked everyone who sent in a recipe,” she said. Mr Ellis glanced at the sheet. “Looks tidy,” he replied, and lifted the box. She followed the columns with her finger. Each name was correct. That was the irritating thing: she could not point to a spelling mistake or a missing recipe writer. Nothing on the page was wrong, yet she no longer wanted to send it to the printer.

Nell considered squeezing one more name beneath the drawing, then fetched the scissors instead. She cut away the bowl and tested a fresh heading in the space: Other helping hands. Before writing any names, she caught Mr Ellis at the door. “Who else should I ask?” she said. He set the box down, opened his notebook again and turned back several pages.
Question 1 of 3 · Inference

Why does Nell ask “Who else should I ask?” rather than simply add Mr Ellis’s name?
Show answer and explanation for reading question 1

Answer: C

Nell discovers that Mr Ellis borrowed the tins and collected handwritten recipes, work she had not noticed while listing writers, photographers and typists. The existing names are correct, but the list misses less visible contributions. Asking who else she should speak to shows that she is reconsidering how she made the list, not just fixing one omission.

A concerns giving recipe writers more space, but Nell is looking for other contributors. B contradicts “Each name was correct”. D assumes a complaint that Mr Ellis never makes; “Looks tidy” is not a request to replace the drawing.

Talk it through: Which two details first make Nell question her list? Ask your child to point to the words that support their answer, rather than guessing what a character might usually do.

Question 2 of 3 · Vocabulary in context

In the final paragraph, what does “squeezing one more name beneath the drawing” suggest?
Show answer and explanation for reading question 2

Answer: D

Here, “squeezing” means finding room in a very limited space. The first paragraph says that scarcely a finger’s width of paper was unused. Nell first considers fitting another name into that crowded layout; then she removes the drawing to make a larger change.

A introduces shortening a name, which the passage never suggests. B uses the physical idea of squeezing or pressing, but the problem is space, not pen pressure. C concerns making a name more prominent; Nell is considering a place beneath the drawing, not moving it ahead of the other names.

Talk it through: Try replacing “squeezing” with “writing”. What extra information about the page would be lost?

Question 3 of 3 · Author’s purpose

A map with a job to do

Imagine that you are making a train map for a city called Bellford. You begin by tracing every railway bend and placing each station exactly where it belongs. The result fits the city beautifully. Unfortunately, the station names in the busy centre pile on top of one another. A passenger trying to find where to change trains must search through a knot of lines and tiny print.

You try again. This time you straighten some bends, spread the central stations apart and bring the outer stations closer together. The city has not changed, but its picture has. There is now room for clear names, and passengers can follow a coloured line without losing it among neighbouring routes. For someone choosing a train, the altered map may be more useful than the carefully traced one.

That usefulness has a boundary. Two stations drawn close together might be a long walk apart, perhaps with a river between them and no nearby bridge. A visitor who uses your map to plan a walk could be badly misled. The same change that makes a train connection easier to see can hide information that matters on foot. A note saying that distances are not to scale helps readers recognise this limit.

Nor can you change everything simply to make the page look tidy. The order of stations must remain correct. Lines that cross on paper must be distinguished from places where passengers can actually change trains. Removing an awkward bend is one thing; inventing a convenient connection is another. The first may clarify the network, while the second sends a passenger on a journey they cannot make.

The question, then, is not just whether a map resembles the ground. It is also which decisions the map helps its reader make. A street map and a train map can show the same city differently without either being carelessly drawn. Each must preserve the relationships needed for its particular job—and make clear which other relationships it does not promise to show.

What is the writer’s main purpose in contrasting a train passenger with someone planning a walk?
Show answer and explanation for reading question 3

Answer: A

The altered map helps a passenger follow routes and find connections, but it may mislead a walker about distances and crossings. The contrast shows why a map can be useful for one purpose without being suitable for another. This supports the final paragraph’s focus on “which decisions the map helps its reader make”.

B turns a particular example into a general claim about which routes are more complicated. C goes beyond the passage: a warning about scale is suggested, not a requirement to add every distance. D contradicts the fourth paragraph, which insists that station order and real connections must remain correct.

Talk it through: Which details may the train map change, and which must it preserve? Ask your child to explain why the distinction matters.

Three practice questions

Back to sections ↑

Quantitative reasoning

Find the best exact purchase, compare data fairly and reason about a spatial arrangement. Each question needs a different approach.

Question 1 of 3 · Finding the lowest cost

Packing a mosaic kit

A workshop needs exactly 28 square tiles and 21 triangular tiles. Tiles are sold only in the packs below. Whole packs must be bought, and no tiles may be left over.

Contents and price of one pack
PackSquare tilesTriangular tilesPrice
Pack P41$5
Pack Q24$6
Pack R65$9
What is the lowest total cost of buying exactly the tiles needed?
Show answer and explanation for quantitative question 1

Answer: B

One R pack contains exactly the same tiles as one P pack plus one Q pack, but costs $9 instead of $11. Without R packs, the exact order is five P packs and four Q packs, costing $49. Replace four P-and-Q pairs with four R packs to save $8. That leaves one P pack and four R packs: 4 + 24 = 28 squares, 1 + 20 = 21 triangles, for $5 + $36 = $41. A fifth R pack would already contain 25 triangles, so no further replacement is possible.

$36 pays for four R packs but leaves out the remaining P pack. $43 is an exact order using two P packs, one Q pack and three R packs, but one more P-and-Q pair can be replaced to save $2. $49 buys the right tiles using only P and Q, but misses the saving from R packs.

Talk it through: Compare what is inside the packs before comparing their prices. Ask your child to check both tile totals and explain why their choice is the cheapest exact order.

Question 2 of 3 · Using a results table

The remaining games

Four teams are taking part in a puzzle challenge. A win earns 1 point and a loss earns 0 points. There are no draws and no other points are awarded. Comet has finished all its games. The table shows the points so far; the only games still to play are listed below it.

Points before the remaining games
TeamPoints so farGames still to play
Comet60
Lark52
Otter52
Wren62

Remaining games: Lark vs Otter; Lark vs Wren; Otter vs Wren.

What is the greatest number of teams that could finish with more points than Comet?
Show answer and explanation for quantitative question 2

Answer: C

Comet will stay on 6 points. Lark and Otter each need two wins to reach 7; one win would only draw level with Comet. Wren needs just one win to reach 7. Lark and Otter cannot both win twice because they play each other, so all three cannot finish above Comet. Two can: let Lark beat both Otter and Wren, then let Wren beat Otter. Lark and Wren each finish on 7, while Otter stays on 5. The greatest possible number is therefore 2.

0 assumes that Comet cannot be overtaken. 1 can result from assuming that every other team needs two wins, overlooking Wren’s 6 points. 3 considers each team’s highest possible score separately, without checking whether those results can happen together.

Talk it through: Ask your child to give a set of game results that achieves their answer, then explain why one more team cannot finish above Comet.

Question 3 of 3 · Spatial reasoning

Two equal pieces

The diagram shows 21 square tiles joined along their edges. Remove exactly one of the labelled tiles, without moving any other tile. Tiles belong to the same piece if you can travel between them through shared edges. Touching only at a corner does not join two pieces.

Tile arrangement with four labelled choicesRow 1: column 1 (C), column 2, column 3. Row 2: column 1, column 3, column 7, column 8, column 9. Row 3: column 1, column 2, column 3 (D), column 4 (A), column 5 (B), column 6, column 7, column 8, column 9. Row 4: column 3, column 7, column 8, column 9.ABCD
Which tile must be removed to leave exactly two separate pieces with the same number of tiles?
Show answer and explanation for quantitative question 3

Answer: B

Removing B cuts the connecting row into two pieces. The left piece has the eight tiles around the gap, the tile projecting below them and tile A: 10 in total. The right piece has a block of nine tiles and one connecting tile: also 10. Every tile in each piece can still be reached through shared edges, and the two pieces no longer touch along an edge.

Removing A leaves pieces of 9 and 11 tiles, which are unequal. Removing C leaves one connected piece: there is still a route around the other side of the gap. Removing D makes three pieces, including the single tile directly below it. Equal totals alone are not enough; the question also requires exactly two connected pieces.

Talk it through: Trace the edge-to-edge connections before counting. Can your child explain why removing D produces three pieces rather than two?

Three practice questions

Back to sections ↑

Abstract reasoning

Look for relationships that hold across the completed diagrams. These three examples use different rules; check every part of each one.

Question 1 of 3 · Visual pattern

Abstract Reasoning sample: a three-by-three pattern with its last panel missingPattern row 1. First panel: row 1: grey columns 1, 2; row 2: grey columns 1, 2; row 3: no grey squares; row 4: no grey squares. Second panel: row 1: no grey squares; row 2: grey columns 2, 3; row 3: grey columns 2, 3; row 4: grey columns 3. Third panel: row 1: grey columns 1, 2; row 2: grey columns 1, 2, 3; row 3: grey columns 2, 3; row 4: grey columns 3. Dots at 2 squares right and 1 squares down from the grid's top-left corner; 1 squares right and 2 squares down from the grid's top-left corner; 2 squares right and 3 squares down from the grid's top-left corner. Pattern row 2. First panel: row 1: grey columns 2, 3; row 2: grey columns 2, 3; row 3: grey columns 2, 3; row 4: grey columns 2. Second panel: row 1: no grey squares; row 2: grey columns 1, 2, 3, 4; row 3: no grey squares; row 4: no grey squares. Third panel: row 1: grey columns 2, 3; row 2: grey columns 1, 2, 3, 4; row 3: grey columns 2, 3; row 4: grey columns 2. Dots at 1 squares right and 1 squares down from the grid's top-left corner; 3 squares right and 1 squares down from the grid's top-left corner; 1 squares right and 2 squares down from the grid's top-left corner; 3 squares right and 2 squares down from the grid's top-left corner; 2 squares right and 3 squares down from the grid's top-left corner. Pattern row 3. First panel: row 1: grey columns 1, 2, 3; row 2: grey columns 1, 2, 3; row 3: no grey squares; row 4: no grey squares. Second panel: row 1: no grey squares; row 2: grey columns 2, 3; row 3: grey columns 2, 3; row 4: grey columns 2, 3, 4. Third panel is missing. Each panel uses the same four-by-four grid. Dots lie on grid intersections.
Choose the missing diagram.
Show answer and explanation for abstract question 1

Answer: B

In each row, combine the grey areas in the first two panels without moving either shape. An area stays grey if it appears in either panel, including where the shapes overlap.

The black dots mark every inward-pointing corner of the combined outline: three in the first completed row and five in the second. In both examples, the inward corner beside the lower extension was already present in one source shape and is still marked. So the dots are not just where the two source outlines cross. Outward-pointing corners are not marked.

In the last row, the combined shape has two inward-pointing corners: one below the left-hand part of the wide top block, and one above the short lower-right extension. Only B has the right outline and marks both of those corners.

  • A: The outline is right, but both dots mark outward-pointing corners.
  • C: One dot is correct; the lower-right dot marks an outward-pointing corner.
  • D: The dots mark inward corners, but the second shape has been moved one square left before combining. The examples keep both shapes in their original grid positions.

Question 2 of 3 · Visual pattern

Two completed network transformations and a third with its result missingRow 1, left: Dot positions on a 176-wide by 132-high panel, measured from the top left: 1 at 20,24; 2 at 59,24; 3 at 59,77; 4 at 20,77; 5 at 105,24; 6 at 148,50; 7 at 105,77; 8 at 126,108; 9 at 151,108. Links: 1–2, 2–3, 3–4, 4–1, 1–3, 5–6, 6–7, 7–5, 2–5, 7–8, 8–9. All dots white. Right: Dot positions on a 176-wide by 132-high panel, measured from the top left: 1 at 20,24; 2 at 59,24; 3 at 59,77; 4 at 20,77; 5 at 105,24; 6 at 148,50; 7 at 105,77; 8 at 126,108; 9 at 151,108. Links: 1–2, 2–3, 3–4, 4–1, 1–3, 5–6, 6–7, 7–5. Black dots: 1, 3; other dots white. Row 2, left: Dot positions on a 176-wide by 132-high panel, measured from the top left: 1 at 17,24; 2 at 17,83; 3 at 49,53; 4 at 91,22; 5 at 145,22; 6 at 145,83; 7 at 91,83; 8 at 91,110. Links: 1–2, 2–3, 3–1, 4–5, 5–6, 6–7, 7–4, 4–6, 3–4, 7–8. All dots white. Right: Dot positions on a 176-wide by 132-high panel, measured from the top left: 1 at 17,24; 2 at 17,83; 3 at 49,53; 4 at 91,22; 5 at 145,22; 6 at 145,83; 7 at 91,83; 8 at 91,110. Links: 1–2, 2–3, 3–1, 4–5, 5–6, 6–7, 7–4, 4–6. Black dots: 4, 6; other dots white. Row 3, left: Dot positions on a 176-wide by 132-high panel, measured from the top left: 1 at 18,26; 2 at 60,26; 3 at 60,70; 4 at 18,70; 5 at 106,70; 6 at 148,70; 7 at 127,26; 8 at 83,95; 9 at 18,110. Links: 1–2, 2–3, 3–4, 4–1, 2–4, 5–6, 6–7, 7–5, 3–8, 8–5, 4–9. All dots white. Right panel missing.?
Choose the missing diagram.
Show answer and explanation for abstract question 2

Answer: A

In each completed row, keep a line only if you can follow a closed loop that includes it. The single link between the two looped groups disappears in both examples, as do the loose branches. The dots stay in their original positions.

Next, fill a dot black if exactly three of the remaining lines meet there. Count after removing the other lines: a dot can lose a branch and become a two-line corner rather than a three-line junction.

For the last diagram, remove the two-line bridge beneath the groups and the loose lower-left branch. Keep the diagonal inside the square: it belongs to two triangular loops. Its two ends are the remaining three-line junctions. This gives A.

  • B: This keeps the lower bridge, which joins the groups but is not part of any closed loop.
  • C: The lines are right, but the filled dots were chosen using the original line counts. Two dots lose bridge links, and the lower-left square corner loses a branch.
  • D: This removes the diagonal inside the square, even though it belongs to closed triangular loops.

Question 3 of 3 · Visual pattern

Two circular arrangements with matching straight rows, and a third row missingRow 1, left: A ring with twelve equally spaced positions and a clockwise arrow. black circle at 12 o'clock; white square at 1 o'clock; black triangle at 3 o'clock; white diamond at 7 o'clock. Other positions empty. Right, from left to right: black circle, white square, black triangle, white diamond. Row 2, left: A ring with twelve equally spaced positions and a clockwise arrow. white triangle at 12 o'clock; black diamond at 2 o'clock; white square at 8 o'clock; black circle at 10 o'clock. Other positions empty. Right, from left to right: white square, black circle, white triangle, black diamond. Row 3, left: A ring with twelve equally spaced positions and a clockwise arrow. black square at 1 o'clock; white circle at 3 o'clock; white diamond at 4 o'clock; black triangle at 10 o'clock. Other positions empty. Right panel missing.?
Choose the missing diagram.
Show answer and explanation for abstract question 3

Answer: C

Find the longest empty stretch around the ring. Imagine cutting the ring somewhere in that stretch, then read the symbols clockwise, following the arrow. The first symbol after that gap comes first in the straight row.

In the first example, the largest gap is between the diamond and the circle, so the row starts with the circle. In the second, it is between the diamond and the square, so the row starts with the square and continues past the top of the ring. Each symbol keeps its original black or white fill.

In the last ring, the longest gap lies between the diamond at the lower right and the triangle at the upper left. Reading clockwise gives black triangle, black square, white circle, white diamond: C.

  • A: This starts with the uppermost symbol instead of the first symbol after the longest empty stretch.
  • B: This starts at the right symbol but reads anticlockwise, against the arrow.
  • D: The order is right, but the circle has changed from white to black.

One picture prompt

Back to sections ↑

Communicating ideas in writing

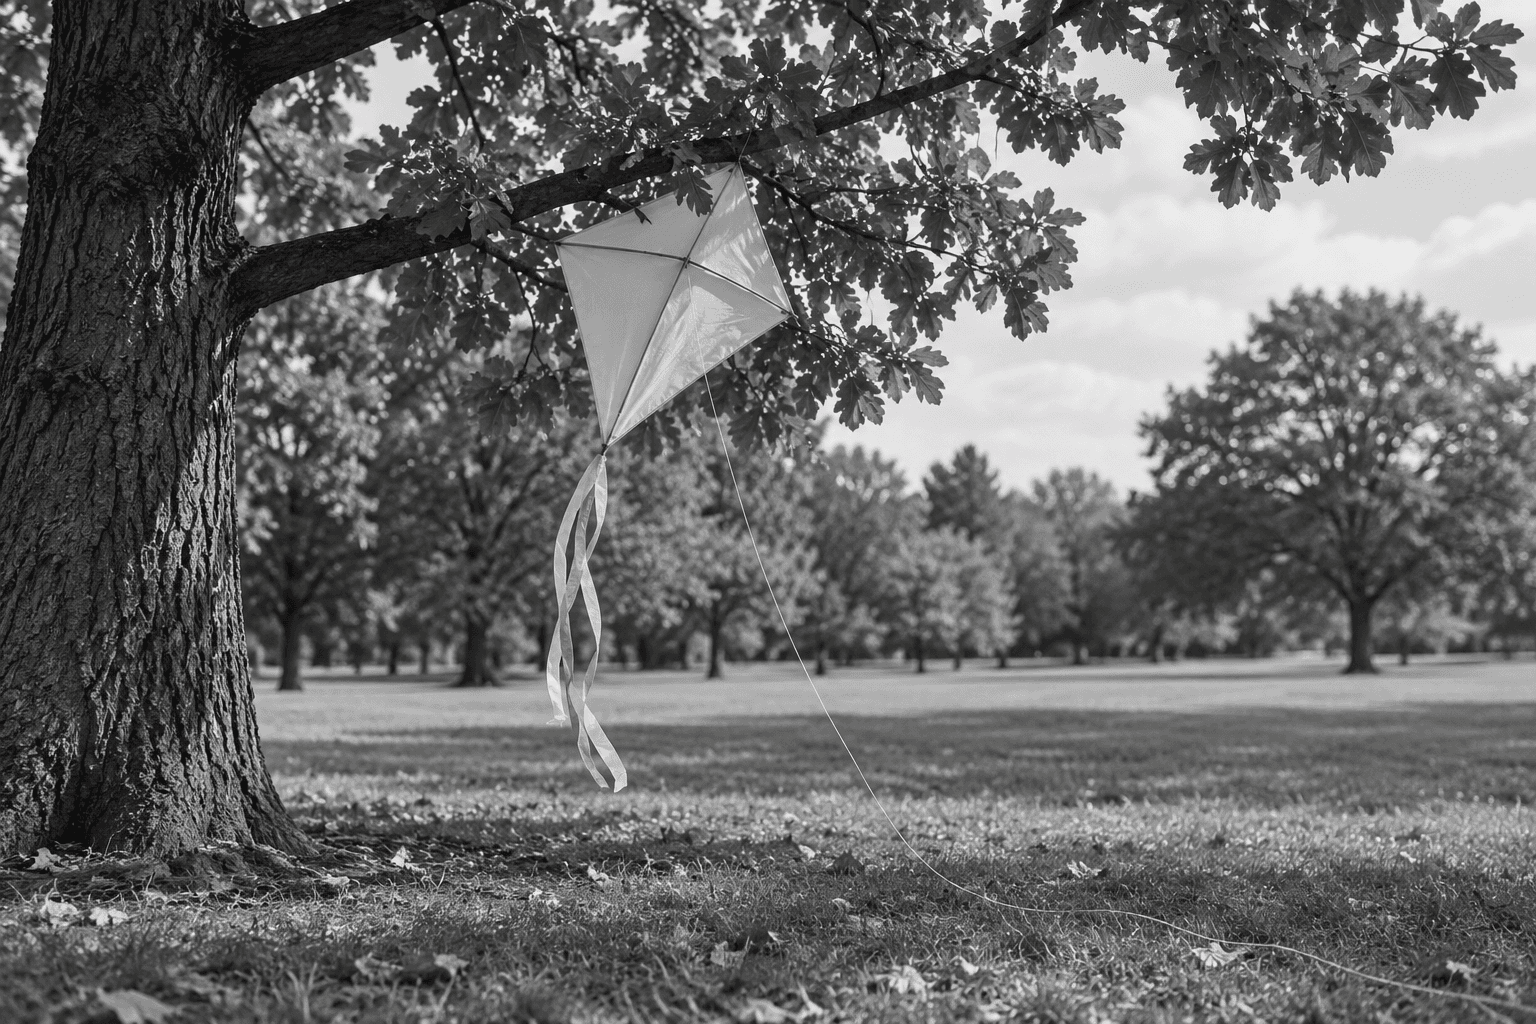
Use the picture as a starting point. Develop your own idea and decide how to communicate it to a reader.

A black-and-white image of a diamond-shaped kite caught against a leafy tree branch in a grassy park. Ribbon tails hang below the kite, and a thin line curves down onto the grass. More trees stand in the background. No people or words appear.
Original AI-generated practice image by Selective Path.

Use this picture as a starting point for your own piece of writing. You could write a story or explore an idea. Your connection to the picture may be literal or figurative.

Write on paper or in your own document. There is no upload or automated marking on this page.

Explore ways to approach the prompt

There is no single correct response. A story could begin before or after the moment in the picture. You could also use the kite or the situation to explore an idea, such as a plan meeting an unexpected obstacle. These are possibilities, not required themes. You do not need to explain who owns the kite or how it gets down.

Try this: Choose one detail in the picture that interests you. What could it set in motion, or what might it represent? Develop that connection with specific details rather than trying to include every object in the scene.

Looking for official ASET samples?

The WA Department of Education publishes the Practice ASET and ASET Handbook. Start there for official sample materials and test guidance. Our examples are independent practice, not past exam papers, and we are not affiliated with or endorsed by the Department.

Find official practice materials

For a plain-English overview, read our WA ASET guide.

Ready for the free practice papers?

Create a free parent account to get one practice paper each in Reading, Quantitative and Abstract Reasoning, plus a Writing activity with AI feedback. Your account saves the results so you can review what to practise next.

Get the free practice papers

No payment required. These public examples stay separate from your scored practice.